-
 jp
en
jp
en
Notification Settings
Users can receive various kinds of notifications regarding the system by email.
You can set whether or not to receive each notification according to the content.
Also, school administrators can create Portal notifications for school users.
Notification Contents
School administrators and teachers can each receive the following notification emails.
You can learn about the notifications for parents in the parent help site.
| Contents | Description |
|---|---|
| Notifications | Check to receive an email when a notification is created for you in the GrapeSEED Portal. (Note: Some crucial notifications may be sent anyway.) |
| Role Added Notification | Check to receive an email when a new role is added to your account. |
| Material Request | In Japan, materials are automatically shipped based on the unit plan. Therefore, this notification is not applicable. |
| Survey Activity | Check to receive an email when a survey response has been received or shared with you. |
| Survey Request | Check to receive an email when a new survey is waiting for your response. |
| Unit Plan Reminder | Check to receive a reminder email a week before your class is scheduled to start a new unit. |
How to Set Notifications
Please follow the steps below to set email notifications.
Sign in to the GrapeSEED School Portal Site.
Click the user name on the top right or in the side menu and select "Edit profile".
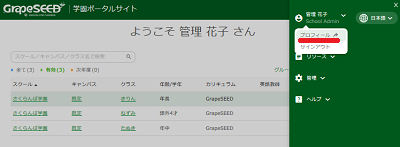
On small-screen devices such as smartphones, click
on the top right to expand the side menu.
- Click "Email Notifications Setting" on the profile page.
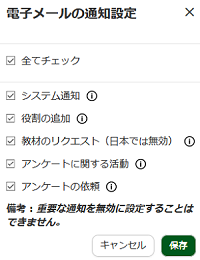
In Email Notification Settings, check the notifications that you require and uncheck the ones that are not necessary.
Click "Save" to save your changes.
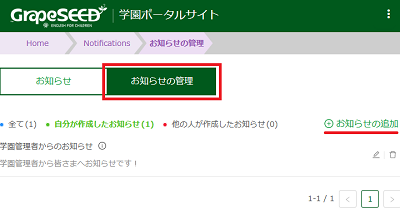
Creating Notifications
School administrators can create notifications for their school's teachers and parents.
Notifications can be displayed on the Portal's bulletin board or sent by email.
Sign in to the GrapeSEED School Portal Site.
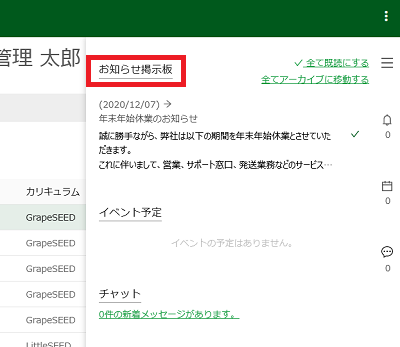
Expand the side menu and select "Bulletin Board".
- Select "Manage Notifications" on the top and click "Add notification" on the right.
- A new notification page will open.
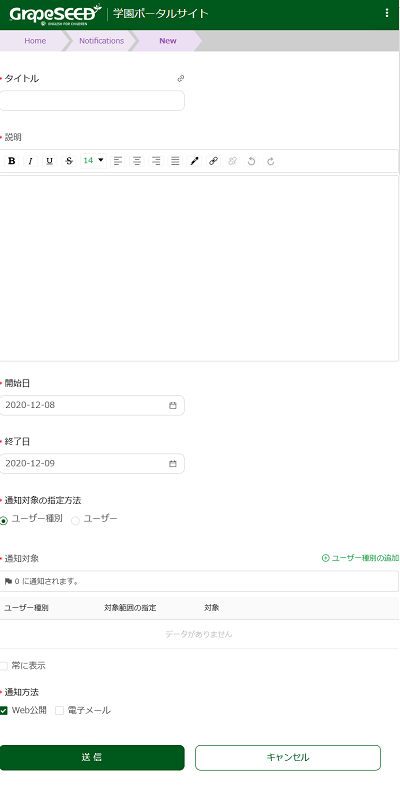
- Enter the following information:
- Title
This is the title of the notification on the bulletin board (and the subject of the email). - Description
This is the content of the notification. You can use the style bar above to set font styles. - Start Date
This is the date to start showing the notification on the bulletin board.
If you are going to send the notification by email, this is the date the email will get sent. - End Date
This is the date to finish showing the notification on the bulletin board. - Scope
Select whether to specify the target users by their roles (e.g. teachers) or to specify them individually. - Notify
If the Scope is Roles: Click Add Role on the right to specify the target users by user roles.
If the Scope is Users: Click Add User on the right to specify the target users by their Portal accounts (email addresses).
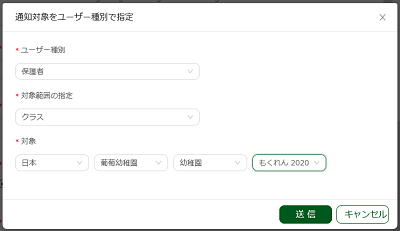
The following image is an example of setting the target users by their role.
In this example, the role is set to Parents, and their class is also specified. You can set to notify only the parents of a specific class.
- Sticky:
By checking this option, the notification will always appear on the top of the bulletin board. - Notification Channel:
Post on website: The notification will appear on the Portal's bulletin board.
Send as email: The notification will be sent by email.
You can choose either option; "Post on website" and/or "Send as email."
- Click "Submit" to send the notification.
- Notifications checked as Post on website will appear on the bulletin board from the "Start Date". Notifications checked as Send as email will be sent by email on the "Start Date".