-
 jp
en
jp
en
In this article
GrapeSEED App
When students register for the GrapeSEED App, they can access the GrapeSEED and LittleSEED contents that they are learning in the classroom from their tablets and smartphones.
Also, the Parent's website provides a way for parents to manage their children's information and to view their children's activities regarding the App.
Descriptions on the following are described here.
- For Students to Use
- For School Admins/Teachers to Use
- Changing a Student's Name
- Checking a Student's App Usage
- Re-registering a Student for the App
- Preventing New Units from Automatically Getting Released on the App
- Reference for Parents
For Students to Use
Following the three steps below will enable students to use the app.
- STEP1: Register Students
- STEP2: Creating the Invitation Letters
- STEP3: Parents Complete the Registration
STEP 1:Register Students

Register in bulk
Create a Student List
Create a student list using the student list template.
Download the Template
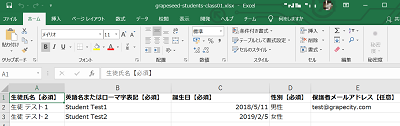
Each student needs the following information:
- Japanese Name
- English Name
The following information is optional:
- Birthday
- Gender
- Parent's Email Address
- Phone Number
Import the Class List
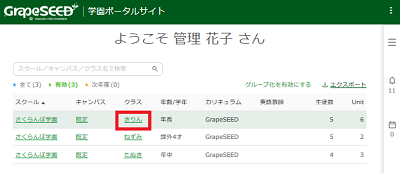
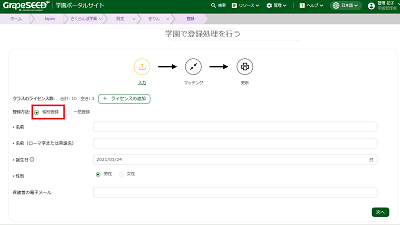
- Sign in to the GrapeSEED School Portal Site, and click the class name that you want to import.
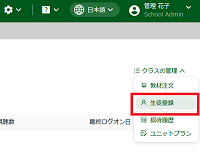
- Click "Manage Class" on the right top, and select "Register Students" from the dropdown list.
- On the Manual Registration Page, select "Bulk" that is in the middle of the page.
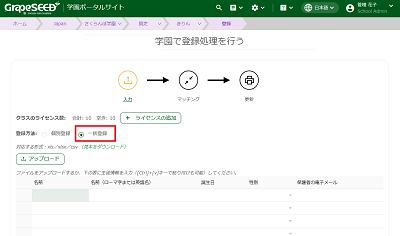
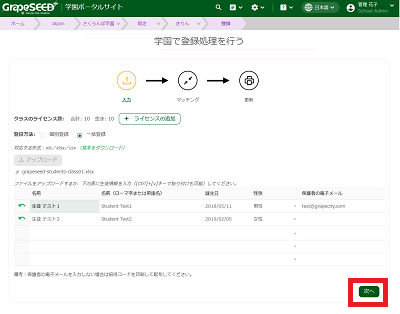
Click "Upload" and select the Excel file you created in STEP 1: Create a Student List.
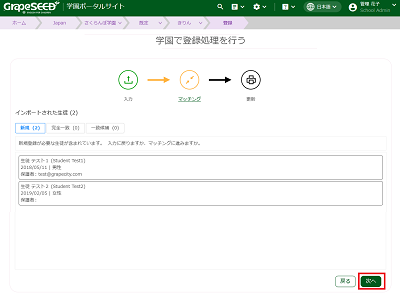
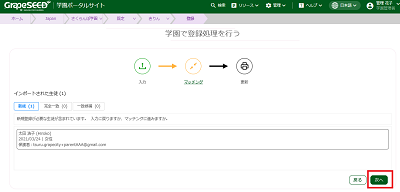
Check to make sure that the students from the Excel file have been imported into the list, and click "Next" on the bottom of the page.
- Students who are registered for the first time will be listed under the "New (count)" tab.
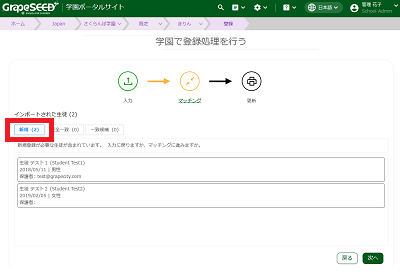
If they have been registered in the past, they will be listed either under "Exact Matches" or "Potential Matches".
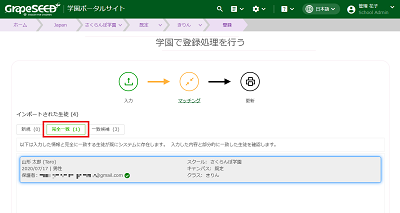
Exact Matches
If a student's information matches exactly in the system with an existing registration, this student is determined as an "Exact Match". You can add this student to the class and complete this student's registration.
An invitation code is not necessary for students who have completed their registration.
Example of an "Exact Match":
Potential Matches
If a portion of the student's information matches the system's existing registration, the student is determined as a "Potential Match." If you find that a student and the potential match are the same student, you can add this student to the class and complete this student's registration.
An invitation code is not necessary for students who have completed their registration.
Example of a "Potential Match":
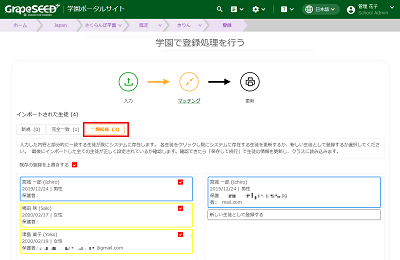
For every student listed under the "Potential Match" category, select either "Overwrite Existing Info" or "Create A New Student".
If the potential match is not the same student or if you are not sure if they are the same student, create a new student by selecting "Create A New Student".
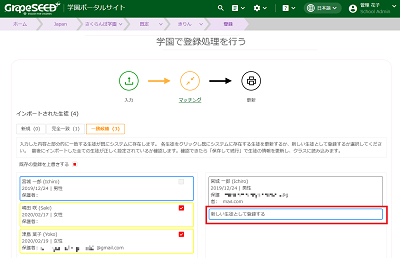
The new student will need an invitation code.
Provide the invitation code to the parent and ask them to register their child.
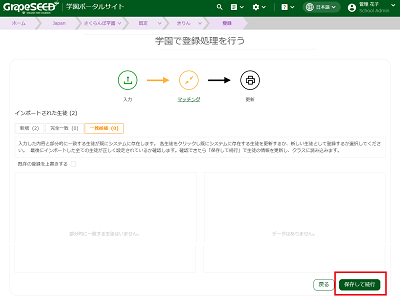
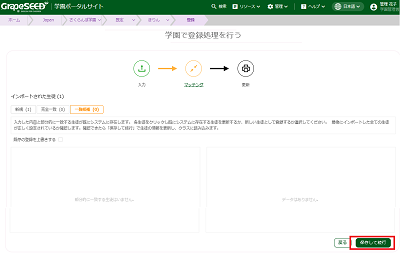
- Review the students under each tab: "New", "Exact Matches", and "Potential Matches."
If a student is listed under "Potential Matches", carefully select either to "Overwrite the existing student" or to "Create a new student".
Click "Next" and open tabs: "New", "Exact Matches", and "Potential Matches" in their order.
Ensure all the students are imported as intended.
- Finally, click Save and Continue and finish the registration.
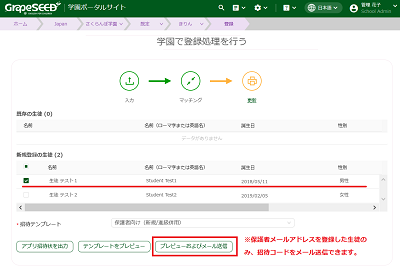
- You will see the list of students who require an invitation. You can print the invitation codes here.
You can print the invitation codes later. It is fine to close this screen for now.
Register by student
The video below will describe the steps to change the unit start dates.
*In addition to the narration in Japanese, subtitles in English are added.
*The steps in the video are also described in the section below.
- Sign in to the GrapeSEED School Portal Site, and click the class name that the student is joining.
- Click "Manage Class" on the right top, and select "Register Students" from the dropdown list.
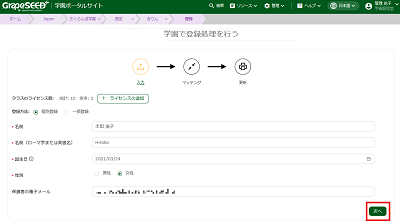
- On the Manual Registration Page, select the "Single" option in the middle of the page.
- Enter the student's information and click "Next" on the bottom of the page.
- Students who are registered for the first time will be listed under the "New (count)" tab.
If they were registered in the past, they will be listed either under "Exact Matches" or "Potential Matches".
Exact Matches
If a student's information matches exactly in the system with an existing registration, this student is determined as an "Exact Match". You can add this student to the class and complete this student's registration.
An invitation code is not necessary for students who have completed their registration.
Example of an "Exact Match":
Potential Matches
If a portion of the student's information matches the system's existing registration, the student is determined as a "Potential Match". If you find that the student and the potential match are the same students, you can add this student to the class and complete this student's registration.
An invitation code is not necessary for the students who have completed their registration.
Example of a "Potential Match":
For every student listed under "Potential Match", select either "Overwrite Existing Info" or "Create A New Student".
If the potential match is not the same student or if you are not sure if they are the same student, create a new student by selecting "Create A New Student".
The new student will need an invitation code.
Provide the invitation code to the parent, and ask them to register their child.
- Review the students under "New", "Exact Matches", and "Potential Matches".
If a student is listed under "Potential Matches", carefully select either to "Overwrite the existing student" or to "Create a new student".
Click the "Next" button and open tabs: "New", "Exact Matches", and "Potential Matches" in order.
Ensure all the students are imported as intended.
- Finally, click "Save and Continue" and finish the registration.
- You will see the list of students who require an invitation. You can print the invitation codes here.
You can print the invitation codes later. It is fine to close this screen for now.
STEP 2: Create the Invitation Letters
Please create the invitation code for each class, and make sure you hand out the letters to the parents of the applicable class.
When to Hand Out Invitation Letters to Parents
Children who will start using the GrapeSEED App for the first time from the new school year will not be able to see any unit on the App until the first lesson of the unit they will start in.
Make sure that you hand out the invitation letters after the first unit start date of the class.
Expiration Date of the Invitation Code
The invitation code will expire 2 months after it has been created. Please tell the parents to register for the App before the code expires.
If any parent attempts to register with an expired invitation code, an error will be displayed. In this case, you can extend the expiration period of the code.
Extending the Expiration Period of an Invitation Code
Please follow the steps in "A parent said that their invitation code has expired" in Frequently Asked Questions.
The video below will describe the steps to create invitation letters.
*The video is in Japanese.
*The steps in the video are described in the section below in English.
Please follow the below steps to create an invitation code.
- Sign in to the GrapeSEED School Portal Site, and click the class you want to create the invitation codes for.
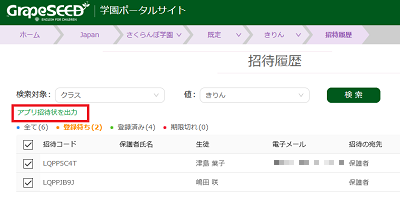
- Click "Manage Class" on the top right of the page and select "Invitation History" from the dropdown list.
- In Portal Invitations, click the "Pending(count)" tab.
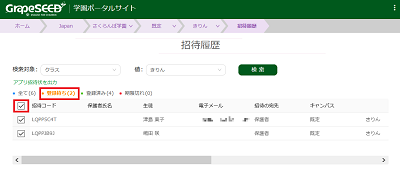
You can create an invitation code for the students you checked in the 1st column.
Check the checkbox on the column header to generate an invitation for all the students.
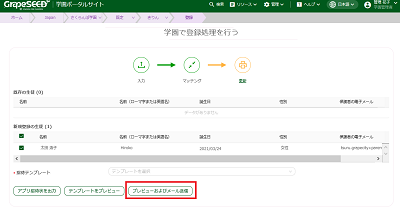
Check the applicable students and click "Print the Invitations".
- Select the invitation template and click Download.

A PDF file is saved on your computer. The file contains the number of pages equivalent to the number of students you created the inviations for. Print it and provide each student the applicable page.
STEP 3: Parents Complete the Registration

Please ask the parents to follow the instruction in the invitation letter and complete the registeration. If they need any help in doing so, please provide them the following contact:
GrapeSEED Technical Support
jp-techsupport@grapeseed.com
For School Admins/Teachers to Use
School administrators and teachers can sign-in to the App with their GrapeSEED School Portal Site account (email address or phone number and password).
Click to access the App from a web browser now
To try the App on a smartphone (tablet)
Search "grapeseed" in the App Store (if you are an iPhone or iPad user) or in Google Play (if you are an Android user), and install the App.
Changing a Student's Name
To change a registered student’s name, follow the steps below:
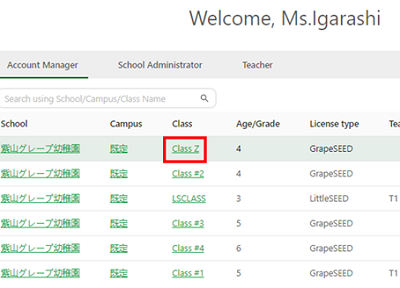
- Sign in to the GrapeSEED portal site. On the Welcome page, click the class name the student whose name you want to change.
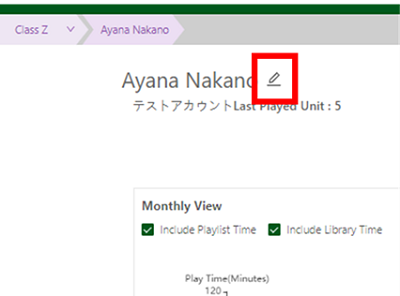
- Click on the student’s name and that student’s information page will open (see image below). Click the pencil icon that appears next to the student’s name to make changes.
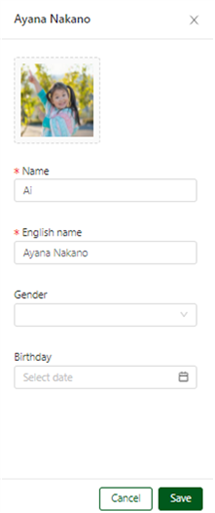
- A pop-up screen will appear (see image below). Edit the information you want to change and press the "Save" button to complete the update.
Information updated on this screen is synchronized with the information displayed on the student app. This information can also be changed by the parent from the parent portal site.
Checking a Student's app usage
School administrators can monitor student app usage.
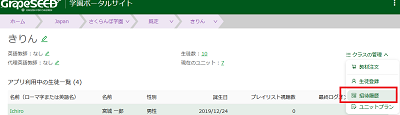
- Sign in to the GrapeSEED portal site. On the Welcome page, click the class name with students you want to check.
- From the class page, click the name of the student you want to check, and graph will be displayed.
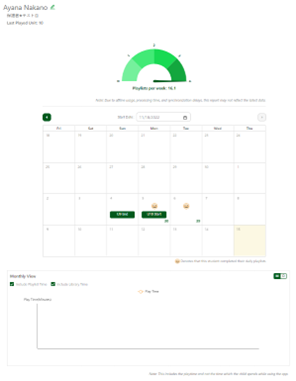
It is synchronized with the app usage information page that parents check daily on their portal site. Student usage is displayed in the following formats.
Calendar
A smiling emoji will appear in the calendar at the top of the screen when an entire playlist is viewed. If the playlist is stopped midway, the smiley face will not appear.
Playlists are available GrapeSEED only. There are no LittleSEED playlists.
Graph
Playlist and library contents (songs and stories) that are viewed to the end are counted as one viewing time. Content that is stopped midway is not counted.
The display can be rearranged by month/day using the button on the upper right.
Re-registering a Student for the App
There are cases when you want to cancel the App registration of a student so that the student can register for the App again.
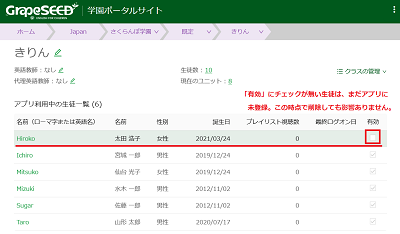
Before canceling a student's App registration, take a look at "Activated", the rightmost column on the class page.
Students who have a checkmark in this column have already been registered to the App by the parent. **They can use the App anytime. To avoid parents' confusion, do not cancel these students unless you have a concrete reason to.
If you still want to cancel a student’s registration, remove the student and add a student. This will enable you to register the student's information again.
- Remove the applicable student. (Please refer to "Removing Students.")
- Add a new student. (Please refer to "Adding New Students.")
- Register the student's information again (Please refer to "Register by student.").
When you remove the applicable student, the student count of the class will be reduced. To prevent erroneous billing, please add a student right after to restore the student count.
Preventing New Units from Automatically Getting Released on the App
Please refer to "Locking New Units from Automatically Getting Released on the App."
Reference for Parents
The following online help will be provided for parents registered for the App.
Please guide the parents to the help site as necessary.
Help site for parents (Japanese)
https://help.grapeseed.com/j/parent-guide