-
 jp
en
jp
en
How to Use Class Management Features
How to Use Jonny Bear Icons for Basic Instruction
The Jonny Bear icons are meant to convey basic instructions to students, you can access these by clicking on the blue circle/Jonny Bear icon in the header of GrapeSEED Connect. After clicking, you will see the various options you can select:
- None: When this is selected, nothing is shown for the students
- Interact: Time for a student to find targets on the component
- Listen: Students should listen
- Question: Students should ask or answer a question
- Quiet: Students should quiet down and wait for instructions
- Sing: Students should sing
- Speak: Students can speak freely
After selecting an icon, the icon will change immediately for you and the students, however on the student screen, the selected Jonny Bear icon will first appear larger and slowly shrink into place in the header of the page.
Be sure to give verbal instructions, as these icons are simply a visual cue.
How to use Student Management Buttons
To manage your individual students, GrapeSEED Connect provides individual Student Management Buttons. These include audio/video control, sticker rewards, video expand and if the student has raised their hand, a control to lower their “hand”. To access these, simply hover your mouse cursor over the student video feed and they will appear above the student feed.
- To toggle a student’s video, you can click on the

- To toggle a student’s microphone, you can click on the

- To toggle a student’s ability to interact with materials, click on the

- To award a sticker to the student, you can click on the

- To enlarge a student’s video feed, you can click on the

- This enlarges the student video only for the teacher.
- If the student has clicked on the raise hand button, you will see both a red ring around their video feed and a
 icon when hovering over the feed. To turn off the red ring, simply click on the .
How to use Class Management Buttons
To manage your entire class at once, GrapeSEED Connect provides Classroom Management Buttons above the video feed gallery. These include audio/video control, and sticker rewards.
- Clicking on the button will award a sticker to the entire class
- Clicking on the will toggle the microphones for all students. The label will tell you what will happen on click, either “Mute all” or “Unmute all”.
- Clicking on the will toggle video for all students. The label will tell you what will happen on click, either “Hide all” or “Show all” video feeds.
- Clicking on the
 icon, you will remove interaction abilities from all student you have previously enabled them for.
Toggling audio or video will have an effect for the teacher AND the students. If you hide all video feeds, students will also not see other students.
How to Use Interaction Indicators
GrapeSEED Connect uses colored rings around the student video feeds to indicate to the teacher the state of that student. At this time there are 3 indicators that a teacher can see: Red, Blue, and Black.

In the image above, you can see a student feed with all 3 indicators on the left and no indicators on the right.
A red indicator means that the student has clicked on the “Raise Hand” icon for some reason. To turn this indicator off, hover over the student’s video feed and click on the ![]() .
.
A blue indicator means that the student is speaking. While you cannot turn this indicator off, you could choose to mute the student which will turn off their microphone and stop them from being able to speak.
A black indicator means that the student has the ability to select targets in the target match activity (interact with the materials). To disable their ability to do that, hover over the student video feed and click on the ![]() to toggle their interactivity.
to toggle their interactivity.
How to Use One-on-One Mode
GrapeSEED Connect has an instructional feature called one-on-one mode. One-on-one mode puts the teacher and selected student in a private channel, while the rest of the class sees only the most recent content shared prior to entering one-on-one mode. This can be used when instructed to by the lesson plans or when individual students need help or one-on-one instruction.
To enter one-on-one mode, click on the name of the student you want to have in the private channel. Once entered, the teacher will continue to have access to all the class materials in the lesson plan as well as the annotation palette, while also seeing a timer, indicating how long they have been in the mode and a large icon to exit the mode.

Meanwhile, the student who has entered one-on-one will see only the content, the teacher, and their own video feed. Other student video feeds will be hidden.
While the teacher and a student are in one-on-one mode, the rest of the class will continue seeing whatever was being shown in the content panel, as well as an visual cue that the teacher is in one-on-one mode with one of their classmates. While this view does not have an actual timer shown, there is an animated hourglass that should be a visual cue that the student should wait. The other student video feeds are also hidden.
To see what the student screen looks like with One-on-One Mode, please see the Parent Connect Guide
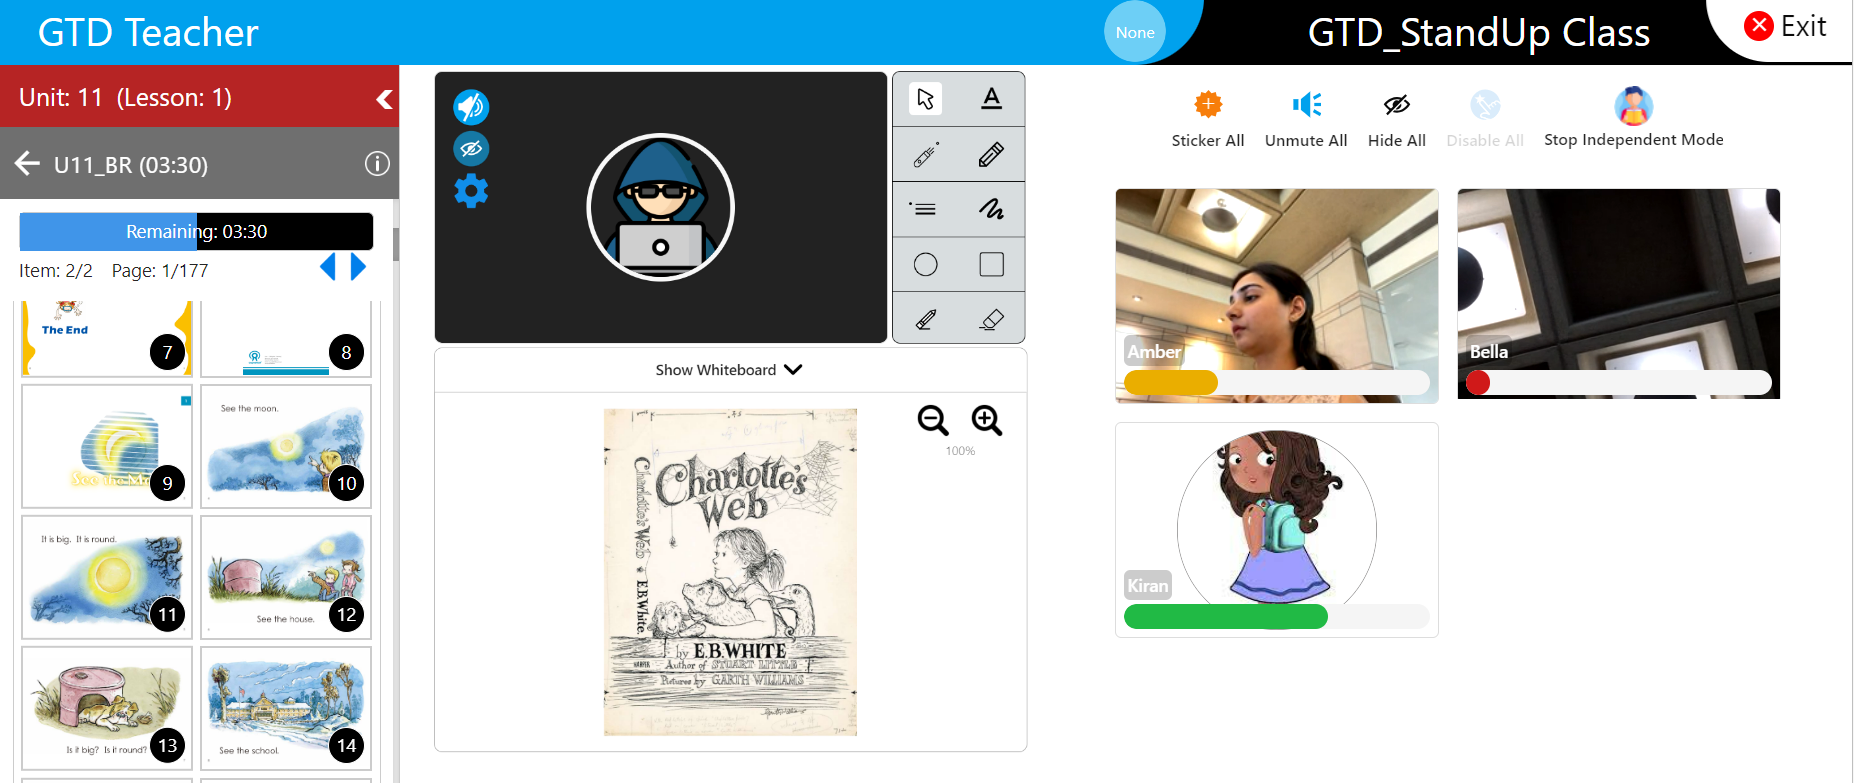
How to Use Independent Mode
Independent mode in GrapeSEED Connect allows students to study independently while being in the class. Only teachers can move in or out from the 'Independent Mode' anytime they want with a toggle button. Students will not see the shared teacher screen in this mode but can navigate back and forth through the content of readers on their screen. In the future, Independent mode will support big books and writers as well.
Click on the 'Start Independent Mode' to start independent mode in a session. Once started, the button will change into a stop button.
Helpers cannot start Independent mode.
While in the 'Independent Mode' teachers can't perform teaching activities and students cannot proceed to the next component.
Teachers will be able to see the student feed with a progress indicator showing their progress. The progress bar will be in:
- Green color showing 60% of covered pages
- Yellow color showing 30-59% of covered pages
- Red color showing less than 30% of covered pages
Progress bar increments with every page and decrements on moving backward.
Teachers can enter into one-on-one mode with students while in Independent mode. The student feed will change to one-on-one mode and will return to Independent mode when the teacher ends the one-on-one mode.
Independent mode will end immediately when the teacher changes the unit, lesson number, or content.